

Cylinders and Piston Rings
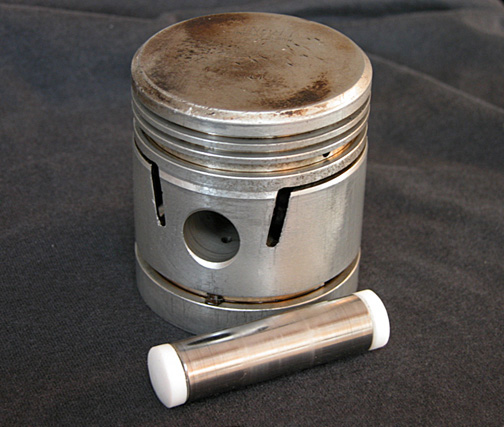
I mic'ed my cylinders (near the bottom, the center and near the top) before sending the block out and found the bores were straight and the clearances fine. There was little work needed, only light honing to break the glaze. My pistons were also in good shape. I was prepared to use a new set of pistons and sleeves I have on hand if either the cylinders or existing pistons needed replacing. Happily that was not necessary and the +.060 pistons would be going back into service. However I would need to get new set of rings. These were purchased from Clive Pearson of UK who deals in ancient pistons, rings and the like. (Pistons pictured here are .030 over and go with a set of liners if bad ever comes to worse.)
Gudgeon Pins
A confirmation from Phoenix that the bushings in the little end of their rods were indeed 16 mm (same size as used in the original pistons) sent me looking for a source for gudgeon (wrist) pins. The closest 16 mm pins I could find came from Dennis Kirk (snowmobile application) but were about 1/8th in. too long.
Teflon Buttons

The pins are tapered on the I.D. and would have to be shortened. The question of how to keep them in the piston presented its self. The only two ways I know of for keeping floating pins off the cylinder walls are (1) circlips or (2) Teflon buttons. Circlips would require cutting ring grooves in the boss of each end of each pistons. Teflon buttons seemed much simpler. The pins though, being tapered, required an equal amount removed from each end to maintain balance. No buttons, of course, are made specifically for this application so I bought a set that were larger (originally made for VW engines) and machined them to fit.
Interestingly some early, pre-war MGs used floating pins with 'duriluminum' caps/buttons for keeping the pins off the cylinder wall.

TURNING BUTTONS FOR THE WRIST PINS
Machining a snug fit into the I.D. of the pins was a slow process. I used Prussian blue inside the pin to test for taper angle and high spots on the buttons. And I left the length of the buttons extending from the end of the pin a few thou. long so that for a final fit I could file off just enough to give me a clearance of about .006 in. from the cylinder wall.
FINISHED PIN WITH BUTTONS
As of early 2020 over 8,000 miles have been covered with the Phoenix Crank and Rod Set.
"Direct Replacement"
I bought the Phoenix crankshaft and rod set from a gentleman who was restoring a TA for a client. He'd purchased the set new from Phoenix Crankshafts in UK but later decided to use an XPAG engine in the car instead of the original MPJG and the set was offered for sale. When it arrived here it was still in its protective paper inside in the wooden shipping crate as it had been when shipped from the manufacturer. The gentleman told me that he had used Phoenix crankshafts in pre-war cars before and, in emails, assured me that it was a "direct replacement"! ...although he had never installed one in a TA... and that he knew nothing about any mods that would be required. Period. Reading between the lines of his email, it didn't take long to realize that I would need to look elsewhere for answers to the questions I was asking.
Internet searches turned up little on Phoenix cranks and nothing on their use in the TA. Then through my correspondence with different MG and British car forums I found an MG P-Type owner who had restored cars using Phoenix cranks AND was happy to offer what assistance he could. The P and
the TA differ considerable but it was a great comfort to have his input. We shared a lot of emails and it was through him I learned that some light grinding might be required on the block allowing the rods sufficient clearance. At least that was his experience with the Ps, and that running into the water jacket could ruin your whole day! And it's thanks his unselfish knowledge and encouragement I was able to carry out the conversion. One "TA" owner questioned my reasoning for spending money on a balanced crank for an MPJG when I could have purchased a 'better' engine (such as an XPAG (or whatever that thing is he's using!)) for a little more than the cost of this setup. I see his point.
But is it truly an M.G. TA without an MPJG engine? Personally I wanted to stick with the MPJG and have an honest TA. I'm still happy that I did.
Why a balanced crankshaft?
A balanced engine is more gentle on its self than one which is not and these old engines need all the help they can get. My engine needed a major overhaul and this crank and rod set just happened to become available as I began the work. Had it not come on the market when it did I doubt I would ever have given it a second thought. However, when it comes to new cranks for pre-war engines -from Bentley and Austin 7 to the OHC M.G. racing engines- the quality of Phoenix crankshafts is generally accepted as top of the line. Why there were so many problems with my crank I do not know. But contacting Phoenix yielded no advise, very little tech info and no replys when questioning the non-original dimensions. I know this is not the first TA crank they ever built and have recently been corresponding with another engine builder currently experiencing similar problems with a TA crank from Phoenix. No matter the reason, I'm pleased with my efforts and the engine runs smoother now, throughout the rpm range. I've not yet tried for maximum revs but the added strength of the new rods along with the balanced crankshaft should make a much stronger bottom end. And it's good to have it humming along beautifully once again.
It is not my intent to disparage anyone or any manufacturer here but to offer my experiences in the hope that it might help other TA owners considering similar modifications.
Bottom Line:
Would I do the Phoenix conversion again? I think so... but ONLY IF I KNEW their (or any other manufacture's) specs were as "Original Equipment". My crankshaft was NOT and it has been a pain in the arse to straighten out. And, there's that nagging business about not being able to remove a piston without pulling the engine. (And sure enough, it happened.) However, because of the balance weights that may be the case with ANY fully balanced crankshaft in the MPJG block. Although it would not necessarily have to be that way... if the balances were designed with cut-outs for removing the pistons.
Post Script to Bottom Line:
After 1600 miles I had a knock beginning to develop in #1 cylinder and the engine was removed (Autumn '09) to solve this problem. The source of the knock was the rod ever so lightly touching the front boss of #1 piston as it passed through TDC.
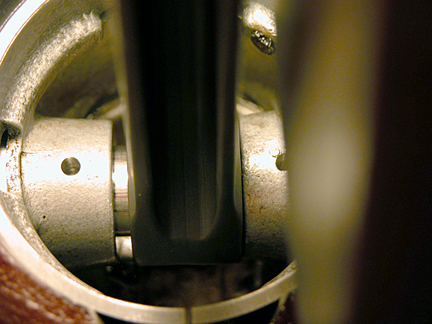
LOOKING DOWN INTO #1 CYLINDER AT TDC - FRONT IS TO THE RIGHT.
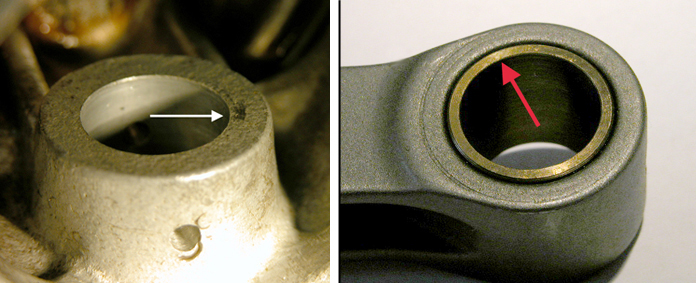
CONTACT POINT - WHERE THE ROD MET THE PISTON
From looking at the mark made by the rod on the piston boss above and hearing the noise made by the contact of the two sounded as if greater damage was being done!
What I found was a combination of problems beginning with the centering of the rod journals on the shaft itself (over my cylinder bores) and complicated by excessive fore and aft movement at the little end when the rod is at TDC. Crankshaft journal off-centering ranges from 0.003 to 0.0175 and considering all the other problems with the Phoenix set it wasn't a happy discovery. These are long rods (190mm between centers) which also contributes to the fore/aft movement at the little end. The side clearance between the big end of the rod and the crank accounts for part of it (0.010) but the rest of the movement comes from the clearance between the bearing and the journal surfaces. The MGB rod bearings (at 0.750 in. vs. 1.080 in.) are not quite as wide as the babbitt surface. And given the same clearance between the bearing and journal the narrower the bearing the greater the fore/aft movement can be at the little end. Rod clearance, when I put the engine together, was 0.0015 and there's still plenty of area on the bearing that hadn't been polished or even touched by the crank. A part of this fore/aft movement will be taken up when the system is under oil pressure but the opportunity for the little end to reach both front and rear extremes remains. And will increase as the bearings wear.
The only solution at that point was to remove a few thou from the piston boss.
I did this on the front bosses of #1 and #4 (The two with the least clearance toward the front. And in fact it was only #1 which was actually contacting the boss.) then reassembled the engine. I've driven near 7,000 miles since then without any unusual noises.
What'd that guy say?... "Direct Replacement" ?
Post Post Script
I'm told that Phoenix went into receivership in 2019.
Contents of this Web Site are copyright © 2020
B Davis.